The mmgroup guide for developers
Introduction
This guide for developers explains some selected topics of the
mmgroup project which are relevant for developers who want to make
changes or bugfixes. It also explains some mathematical aspects of the
implementation which are not covered by [Sey20].
The guide is far from complete and we hope that we can provide more information in future versions of it.
Directory structure
The directory is organized as follows:
[Root directory]Contains setup.py and configuration files
docs
sourcesSource files for documentation with Sphinx
src
mmgroupThe directory containing the package, and also extensions and shared libraries
devContains stuff needed by developers, including scripts and source file for generating C code automatically.
generate_cThe code generator (for generating C code automatically)
structuresSome basic structures used by the modules inmmgroup
testsTest scripts and some algebraic structures used for testing withpytest
Directory src/mmgroup/dev has the following subdirectories:
c_filesContains automatically generated C code
clifford12Scripts for generating C code related to the subgroup \(2^{1+24}.\mbox{Co}_1\) of the monster and also to a Clifford group resembling that subgroup.
generatorsScripts for generating tables related to the monomial operation of the element \(\xi\) of \(\mathbb{M}\), and also for generating C code related to certain subgroups of \(\mathbb{M}\).
hadamardScripts for generating C code related to Hadamard matrices
mat24Scripts for generating C code related to the Mathieu group \(\mbox{Mat}_{24}\)
mm_basicsScripts for generating C code related to the representation \(\rho_p\) of \(\mathbb{M}\)
mm_opScripts for generating C code related to the operation of \(\mathbb{M}\) on \(\rho_p\) for specific values \(p\)
mm_reduceScripts for generating C code related to the word shortening algorithm and the computation of the order in \(\mathbb{M}\).
pxd_filesContains files with extension.pyx, .pxd, .pxiused byCython, which are automatically generated or copied from a different source location
Directory src/mmgroup/tests has the following subdirectories:
groupsSlow python implementations of certain groups, including a preimage of \(\mathbb{M}\), for testing.
spacesSlow python implementations of certain vector spaces, including the space \(\rho_p\), for testing.
test_xxxTest scripts (to be executed withpytest) for testing modulexxx.
Some mathematical aspects of the implementation
Implementing Automorphisms of the Parker loop
A standard automorphism \(\pi\) of the Parker loop
\(\mathcal{P}\) is implemented as an array of 12 integers
of type uint32_t. The lower 13 bits of the \(i\)-th entry
of that array contain the image of the \(i\)-th basis element
\((b_i,0)\) of the Parker loop, where \(b_i\) is the
\(i\)-th basis vector of the Golay code \(\mathcal{C}\). These
images describe the automorphism \(\pi\) uniquely. Each element of
\(\mathcal{P}\) has a unique representation as a tuple
\(d = (d, \lambda)\), \(d \in \mathcal{C}\),
\(\lambda \in \mathbb{F}_2\).
A key task is to compute the image \((d, \lambda) \cdot \pi\) of an element \((d, \lambda)\) of the Parker loop under the automorphism \(\pi\). By Lemma 4.1 in [Sey20] there is a quadratic form \(q_\pi\) with associated bilinear form \(\theta_\pi\) on the Golay code satisfying
for any \((d, \lambda) \in \mathcal{P}\). So the image \((d, \lambda) \cdot \pi\) can be computed if \(q_\pi(d)\) can be computed. A functional value of \(q_\pi(d)\) can easily be computed from the associated bilinear from \(\theta_\pi`\) if the values \(q_\pi(b_i)\) are known for all basis vectors \(b_i\). The values \(q_\pi(b_i)\) can be computed from the sign bits of the images if the basis vectors.
So it suffices to compute the bilinear form \(\theta_\pi\) as a \(12 \times 12\) bit matrix. The first term \(\theta\) of \(\theta_\pi\) does not depend on \(\pi\) and can be stored as a constant. The second term \(\theta^\pi\) of that matrix is computed as follows:
Let \(c_i\) = \((b_i)^\pi\), and let \(C\) be the matrix with entries \(c_{i,j}\) such that \(c_i\) = \(\sum_j c_{i,j} b_j\). So \(C\) is just the matrix of the images of the basis vectors, ignoring the signs of the Parker loop.
Row \(i\), column \(j\) of matrix \(\theta^\pi\) is equal to \(\theta(c_i,c_j)\). Since \(\theta(c_i,c_j)\) is linear in its second argument, we have
Here \(\theta^\pi(c_i)\) is just the \(i\)-th row of the bit matrix \(\theta^\pi\). We also store the values \(\theta(d)\) for all \(d \in \mathcal{C}\) in a table. Thus the bilinear form \(\theta_\pi\) can essentially be computed as a product of two \(12 \times 12\) bit matrices.
We store the lower triangular submatrix of the bit matrix
\(\theta_\pi\) in bits 13, ..., 24 of the array representing
the automorphism \(\pi\) of the Parker loop.
Implementing generators of the Monster group
The operation \(y_{f} \cdot x_{e} \cdot x_\epsilon\)
The operation \(g = y_{f} \cdot x_{e} \cdot x_\epsilon\) on
\(\rho_p\) is coded in function mm_op<p>_xy in the
automatically generated C file mm_op<p>_xy.c for the modulus p.
The C function performs that operation for arbitrary
\(e, f \in \mathcal{P}\) and \(\epsilon \in \mathcal{C}^*\)
in a single pass.
That operation is monomial and the formula for it can easily be
deduced from the information in [Sey20].
For \(v \in \rho_p\) the C program calculates the components in \(V_A, V_B, V_C \ldots\) of the result \(v \cdot g\) in their natural order. For implementing such a program it is useful to have a formula for the operation of \(g^{-1} = x_\epsilon \cdot x_{\bar{e}} \cdot y_{\bar{f}}\). In the sequel we state the operation of \(g^{-1}\) on \(\rho_p\).
In this subsection we use the operator ‘\(\oplus\)’ for the programmer’s multiplication in the Parker loop \(\mathcal{P}\), which we define by:
Then ‘\(\oplus\)’ is a simple XOR operation on a computer; and the standard product \(d_1 d_2\) in the Parker loop is given by \(d_1 d_2 = (-1)^{\theta(d_1, d_2)} d_1 \oplus d_2\) for \(d_1, d_2 \in \mathcal{P}\). Note that ‘\(\oplus\)’ depends on the selected cocycle \(\theta\). We may store the cocycles \(\theta(d)\) in a table, with one 12-bit entry representing the element \(\theta(d Z(\mathcal{P}))\) of the Golay cocode for each of the 2048 cosets \(d Z(\mathcal{P})\) of \(Z(\mathcal{P}) = \{\pm 1, \pm \Omega\}\) in \(\mathcal{P}\). So multiplication in \(\mathcal{P}\) is easy.
Put \(d^{[0]} = d^+, d^{[1]} = d^-\), and \(X^+_{d,\delta} = X^{\vphantom{+}}_{\Omega d,\delta}\) if \(x^{\vphantom{+}}_{\Omega d,\delta}\) is short, \(X^+_{d,\delta} = X^{\vphantom{+}}_{d,\delta}\) otherwise. Then
Conjugation of \(\tilde{x}_d x_\delta\) with \(y_e\)
Sometimes we have to conjugate an element \(\tilde{x}_d x_\delta\), where \(\tilde{x}_d = x_d x_{\theta(d)}\), with \(y_e\). We have
Computations in the Leech lattice modulo 2
In this section we describe the operation of the Conway group \(\mbox{Co}_1\) on \(\Lambda / 2 \Lambda\), where \(\Lambda\) is the Leech lattice. The description of these orbits is taken from [Sey22], Appendix A.
This operation is important for computing in the subgroup \(G_{x0}\) of structure \(2^{1+24}.\mbox{Co}_1\) of the monster, as described in [Con85] and [Sey20]. Let \(Q_{x0}\) be the normal subgroup of \(G_{x0}\) of structure \(2^{1+24}\). The group \(\mbox{Co}_1 = G_{x0}/Q_{x0}\) is the automorphism group of \(\Lambda / 2 \Lambda\). We assume that \(\mbox{Co}_1\) and also \(G_{x0}\) operate on \(\Lambda / 2 \Lambda\) by right multiplication. Let \(\Omega\) in \(\Lambda / 2 \Lambda\) be the type-4 vector corresponding to the the standard coordinate frame in \(\Lambda\). The stabilizer of \(\Omega\) is a subgroup \(N_{x0}\) of \(G_{x0}\) of structure \(2^{1+24}.2^{11}.M_{24}\). Thus the set of type-4 vectors in \(\Lambda / 2 \Lambda\) corresponds the set of right cosets \(2^{11}.M_{24} \backslash \mbox{Co}_1\). We have \(N_{x0} \backslash G_{x0} \cong 2^{11}.M_{24} \backslash \mbox{Co}_1\). So identifying the right coset \(N_{x0} h\) for a \(h \in G_{x0}\) reduces to the computation of the frame \(\Omega h\).
In our construction of the monster the element \(h\) may be given as an arbitrary word in the generators of \(G_{x0}\) (modulo \(Q_{x0}\)). So it is important to find a short word \(g\) in the the generators of \(G_{x0}\) with \(g \in N_{x0} h\). This can be achieved by applying a sequences \(g' = g'_1,\ldots,g'_k\) of automorphisms of \(\Lambda / 2 \Lambda\) to \(\Omega h\) such that \(\Omega h g' = \Omega\), and each \(g'_i\) corresponds to a generator of \(G_{x0}\) (modulo \(Q_{x0}\)).
We assume that the reader is familiar with the Conway group \(\mbox{Co}_1\) and the geometry of the Leech lattice as described in [Iva99], section 4.1 - 4.7.
Orbits of the group \(N_{x0}\) in the Leech lattice mod 2
In this subsection we describe the orbits of \(N_{x0}\) on \(\Lambda / 2 \Lambda\). The type of a vector in \(v \in \Lambda\) is the halved scalar product \(\frac{1}{2} \langle v, v \rangle\). The type of a vector in \(\Lambda / 2 \Lambda\) is the type of its shortest representative in \(\Lambda\). Each vector in \(\Lambda / 2 \Lambda\) has type 0, 2, 3 or 4; and the group \(\mbox{Co}_1\) is transitive on the vectors of any of these types.
The orbits of the groups \(N_{x0}\) on the vectors of type 2,3, and 4 on \(\Lambda\) have been described in [Iva99], Lemma 4.4.1. \(N_{x0}\) acts monomially on the the lattice \(\sqrt{8} \Lambda\), which has integers coordinates in the standard Euclidean basis. Thus an orbit of \(N_{x0}\) on \(\Lambda / 2 \Lambda\) can be described by the shapes of the shortest vectors in the corresponding orbit of \(\sqrt{8} \Lambda\). Here the shape of a vector is the multiset of the absolute values of the coordinates of the vector. E.g. a vector of shape \((3^5 1^{19})\) has 5 coordinates with absolute value 3 and 19 coordinates with absolute value 1.
A vector of type 2 or 3 in \(\Lambda / 2 \Lambda\) has two opposite representatives of the same type in \(\Lambda\); so its shape is uniquely defined. A vector of type 4 in \(\Lambda / 2 \Lambda\) has \(2 \cdot 24\) representatives of type 4 in \(\Lambda\) which are orthogonal except when equal or opposite. It is well known that a type-4 vector in \(\Lambda / 2 \Lambda\) corresponds to a coordinate frame in the Leech lattice in standard coordinates, see e.g. [CS99], [Iva99].
The table at Lemma 4.4.1. in [Iva99] assigns a name and a shape to each orbit of \(N_{x0}\) on the vectors of type 2, 3, and 4 in \(\Lambda\). The table at Lemma 4.6.1. in [Iva99] assigns a name and one or more shapes to each orbit of \(N_{x0}\) on the vectors of type 4 in \(\Lambda / 2 \Lambda\). We reproduce this information for the orbits of \(N_{x0}\) on \(\Lambda / 2 \Lambda\) in the following table. Here we also assign a subtype (which is a 2-digit number) to each orbit. The first digit of the subtype specifies the type of the orbit and the second digit is used to distinguish between orbits of the same type.
Let \(\mathcal{C}\) be the Golay code and \(\mathcal{C}^*\) is the Golay cocode. For \(d \in \mathcal{C}, \delta \in \mathcal{C}^*\) let \(\lambda_d, \lambda_\delta \in \Lambda / 2 \Lambda\) be defined as in [Sey20], Theorem 6.1. Conway’s definition of \(\lambda_d, \lambda_\delta\) in [Con85] differs slightly from that definition. Each \(v \in \Lambda / 2 \Lambda\) has a unique decomposition \(v = \lambda_d + \lambda_\delta, d \in \mathcal{C}, \delta \in \mathcal{C}^*\). The subtype of a vector \(\lambda_d + \lambda_\delta \in \Lambda / 2\Lambda\) can be computed from \(d\) and \(\delta\), as indicated in the following table:
Remarks
\(|\delta|/2 = 1 + |d|/8 \pmod{2}\), \(\delta \subset d \Omega^{1 + |d|/8}\) for a suitable representative \(\delta\) of the cocode element.
\(|\delta|/2 = |d|/8 \pmod{2}\), \(\delta \subset d \Omega^{1 + |d|/8}\) for a suitable representative \(\delta\) of the cocode element.
None of the conditions stated in Remarks 1 and 2 hold.
Here column Subtype lists the two-digit number that we use for describing the orbit. Columns Name and Shape list the names and the shapes of the orbits as given in [Iva99], Lemma 4.1.1 and 4.6.1. Columns \(|d|\) and \(|\delta|\) list conditions on the weight of a Golay code word \(d\) and of (a shortest representative of) the Golay cocode element \(\delta\), respectively. Column \(\langle d, \delta \rangle\) lists conditions on the scalar product of \(|d|\) and \(|\delta|\). All this information can easily be derived from [Iva99] and [Con85] (or [Sey20]).
The table provides enough information for effectively computing
the subtype of an element \(\lambda_d + \lambda_\delta\) from
\(d\) and \(\delta\). Function gen_leech2_type in file
gen_leech.c computes that subtype. It returns e.g. the subtype
46 as the hexadecimal number 0x46.
The following table may be helpful for memorizing the second digit of a subtype of a vector in \(\Lambda / 2 \Lambda\).
Operation of the group \(G_{x0}\) on the Leech lattice
The generators \(x_d, x_\delta, y_d, x_\pi, \xi\), with \(d \in \mathcal{C}, \delta \in \mathcal{C}^*, \pi \in \mbox{Aut}_{St} \mathcal{P}\) operate on the subgroup \(G_{x0}\) of the monster and also on \(\Lambda / 2 \Lambda\), as described in [Sey20]. Here \(x_d, x_\delta\) operate trivially on \(\Lambda / 2 \Lambda\). \(y_d\) and \(x_\pi\) act as permutations and sign changes on the coordinates of \(\Lambda\), respectively; they do not change the subtype.
From the Leech graph in [Iva99], section 4.7, we see how the generators \(\xi\) and \(\xi^2\) may change the subtype of a type-4 vector in \(\Lambda / 2 \Lambda\). The following figure shows a subgraph of that graph. It shows the transitions of subtypes of type-4 vectors (due to transformations by \(\xi\) or \(\xi^2\)) that we actually use.
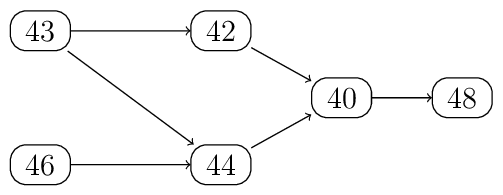
Transitions of subtypes of type-4 vectors in the Leech lattice mod 2
We will provide some more information about the operation of \(\xi^k\) on \(\Lambda\).
We say that a vector \(w \in \mathbb{Z}^n\) is of shape \((m^\alpha 0^{n-\alpha} \bmod 2m)\) if \(w\) has \(\alpha\) coordinates equal to \(m\) \(\pmod{2m}\) and \(n-\alpha\) coordinates equal to \(0\) \(\pmod{2m}\). For a vector \(v = (v_0,\ldots, v_{23}) \in \mathbb{R}^{24}\) define \((v_{4i}, v_{4i+1}, v_{4i+2}, v_{4i+3}) \in \mathbb{R}^4\) to be the \(i\)-th column of \(v\). This definition is related to the Miracle Octad Generator (MOG) used for the description of the Golay code and the Leech lattice, see [CS99], chapter 11. The following lemma has been shown in [Sey22].
Lemma
Let \(v \in \sqrt{8} \Lambda\), and let \(v^{(k)} = v \cdot {\xi^k}\). Let \(w\) be a column of \(v\), and let \(w^{(k)}\) be the corresponding column of \(v^{(k)}\). Then \(|w^{(k)}| = |w|\). If \(w\) has shape \((m^4 \bmod{2m})\) then there is a unique \(k \in \{1,2\}\) such that \(w^{(k)}\) has shape \((0^4 \bmod{2m})\). If \(w\) has shape \((m^2 0^2 \bmod{2m})\) then \(w^{(k)}\) has shape \((m^2 0^2 \bmod{2m})\) for all \(k \in \mathbb{Z}\).
Computing a transversal of \(G_{x0} \backslash N_{x0}\)
The cosets in \(G_{x0} \backslash N_{x0}\) correspond to the type-4 vectors in the Leech lattice modulo 2. Thus for computing a transversal of \(G_{x0} \backslash N_{x0}\) we have to compute an element of \(G_{x0}\) that maps the standard frame \(\Omega\) in \(\Lambda/ 2 \Lambda\) to a vector \(v\) for a given vector \(v\) of type 4 in \(\Lambda/ 2 \Lambda\).
In the next few subsections we show how to map a vector of subtype
4x to a vector of subtype 48 by a sequence of generators
\(x_\pi, \xi^k\) of length at most 6. The proofs are a bit
involved, but the C function gen_leech2_reduce_type4_vector in
file gen_leech.c constructs that sequence very fast. Then the
inverse of the element computed by function
gen_leech2_reduce_type4_vector is the requested element of
the transversal.
If we select a permutation in the Mathieu group \(M_{24}\) then
we actually have to select an element of the group
\({{\rm Aut}_{{\rm St}} \mathcal{P}}\) of standard automorphisms
of the Parker loop described in Automorphisms of the Parker loop. Whenever we have
to select a permutation mapping a certain set to another set, we want
to keep the inverse of the selected element of
\({{\rm Aut}_{{\rm St}} \mathcal{P}}\) as simple as possible.
More specifically, for that inverse we select the standard
representative in \({{\rm Aut}_{{\rm St}} \mathcal{P}}\) of the
least feasible permutation in lexicographic order. We use the
function mat24_perm_from_map in file mat24_functions.c
for finding a suitable permutation in \(M_{24}\).
Incorporating the baby monster into the computation of a transversal
The capability of computing in a subgroup \(H^+\) of structure \(2.B\) of the monster \(\mathbb{M}\) (where \(B\) is the baby monster) is crucial for the success of our project. Although not strictly necessary, we want to select elements of \(H^+\) in our transversal of \(G_{x0} \backslash N_{x0}\) whenever possible. In this subsection we explain how to do so. This is a bit technical and may be skipped at first reading.
Let \(\beta = {\small \frac{1}{\sqrt{8}}}(e_2 - e_3) \in \Lambda\), where \(e_i\) is the \(i\)-th unit vector in \(\mathbb{R}^{24}\). Then \(\beta\) is of type 2 in the Leech lattice \(\Lambda\), and the centralizer \(H^+\) of \(x_\beta\) in \(\mathbb{M}\) has structure \(2.B\), and the centralizer \(H\) of \(x_\beta\) in \(G_{x0}\) has structure \(2^{1+22}.\mbox{Co}_2\). Our goal is find a representative of a coset in \(N_{x0} \backslash G_{x0}\) in \(H\) (centralizing the element \(x_\beta\) of \(\mathbb{M}\)) whenever possible.
The coset in \(N_{x0} \backslash G_{x0}\) corresponding to a vector \(v \in \Lambda / 2 \Lambda\) of type 4 has a nonempty intersection with \(H\) if and only if \(v + \beta\) is of type 2 and orthogonal to \(\beta\) in the real Leech lattice \(\Lambda\), see [Sey22] for details.
If this is the case then we compute an element of \(H \subset G_{x0}\) that maps \(v + \beta\) to the type-2 vector \(\Omega + \beta\) and fixes \(\beta\).
Note that the generator \(\xi\) fixes \(\beta\). A permutation \(\pi \in M_{24}\) fixes \(\beta\) if and only if it fixes the set \(\{2,3\}\) of points.
From subtype 46 to subtype 44
Let \(\lambda_r = \lambda_d + \lambda_\delta\) be of subtype 46. Then \(d\) is a dodecad. Assume that \(d\) contains one column of the MOG. Then up to signs and permutation of the columns of the MOG, and up to permutation of the entries of a column, there is a vector \(v \in \sqrt{8}\Lambda\) with \(v/\sqrt{8} = \lambda_r \pmod{2\Lambda}\) that has MOG coordinates
By the Lemma given above there is a \(k \in \{1,2\}\) such that column 0 of the the vector \(w = v \cdot {\xi^k}\) has shape \((4 \, 0^3)\). The other columns of \(w\) have the same shape as the corresponding columns of \(v\). Thus \(w\) has shape \((4 \, 2^8 0^{15})\). So using the table given above we see that \(w\) has type 44.
Note that both, the dodecad \(d\) and its complement, contain exactly one column of the MOG. The union of these two columns is a grey even octad \(o\).
With a little extra effort we can show \(k = 2 - \langle o, \delta \rangle\), where \(\langle ., . \rangle: \mathcal{C} \times \mathcal{C}^* \rightarrow \{0,1\}\) is the scalar product.
If dodecad \(d\) does not contain a column of the MOG then we select a permutation that maps the first four entries of dodecad \(d\) to the points \(0,1,2,3\), i.e. to the first column of the MOG. Then we proceed as above.
From subtype 43 to subtype 42 or 44
Let \(\lambda_r = \lambda_d + \lambda_\delta\) be of subtype 43. Then \(|\delta| = 3\). The three points of \(\delta\) can lie in one, two, or three different columns of the MOG.
If all entries of \(\delta\) lie in the same column of the MOG then up to signs and permutation of the columns of the MOG, and up to permutation of the entries of a column, there is a vector \(v \in \sqrt{8}\Lambda\) with \(v/\sqrt{8} = \lambda_r \pmod{2\Lambda}\) that has MOG coordinates
By the Lemma given above there is a \(k \in \{1,2\}\) such that one column of \(w = v \cdot {\xi^k}\) (and hence all columns) have even entries. Column 0 of \(w\) has squared norm \(44 = 6^2 + 2^2 + 2^2 + 0^2\). That decomposition of \(44\) into a sum of four even squares is unique, so column 0 has shape \((6 \, 2^2 0)\). The other columns have shape \((2 \, 0^3)\). So \(w\) is of shape \((6 \, 2^7 0^{15})\) and hence of subtype 42.
With a little extra effort we can show \(k = 2 - \langle d, \omega \rangle\), where \(\omega\) is the standard tetrad represented by \(\{0,1,2,3\}\), and \(\langle ., . \rangle\) as above.
If the entries of \(\delta\) lie in two different columns of the MOG then up to signs and permutations as above, the corresponding vector in \(v \in \sqrt{8}\Lambda\) has MOG coordinates
By a similar argument as in the first case there is a \(k \in \{1,2\}\) such that the first two columns of \(w = v \cdot {\xi^k}\) have shape \((4 \, 2\, 0^2)\) and \((4 \, 2^3)\), and that the other columns of \(w\) have shape \((2 \, 0^3)\). Thus \(w\) is of subtype 44.
If the entries of \(\delta\) lie in three different columns of the MOG then we apply a permutation in \(M_{24}\) that maps \(\delta\) to \(\{1,2,3\}\), and proceed as in the first case.
From subtype 44 to subtype 40
Let \(\lambda_r = \lambda_d + \lambda_\delta\) be of subtype 44. Then \(d\) is an octad or a complement of an octad. We call that octad \(o\). If the cocode word \(\delta\) is a duad, let \(c_0, c_1\) be the two points in that duad. Otherwise, let \(c\) by any tetrad intersecting the octad \(o\) in two points, so that \(c\) is equal to the sextet \(\delta\) modulo the cocode \(\mathcal{C}^*\). Let \(c_0, c_1\) be the two points in \(c\) which are not in the octad \(o\).
Assume first that \(o\) is a grey even octad, i.e. a union of two columns of the MOG, and that the points \(c_0, c_1\) are in the same column of the MOG.
Then up to signs and permutation of the columns of the MOG, and up to permutation of the entries of a column, there is a vector \(v \in \sqrt{8}\Lambda\) with \(v/\sqrt{8} = \lambda_r \pmod{2\Lambda}\) that has MOG coordinates
Similar to the previous cases, we can show that there is a unique \(k \in \{1,2\}\) such that \(w = v \cdot {\xi^k}\) has shape \((4^4 0^{20})\). So \(w\) is of subtype 40.
One can show \(k = 2 - \sigma\), where \(\sigma = |c \cap w | \pmod{2}\), \(\sigma \in \{0,1\}\) , and \(w\) is any of the two columns of the MOG contained in the octad \(o\).
If the octad \(o\) and the two points \(c_0, c_1\) do not satisfy the condition given above then we first construct a permutation that maps \(c_0, c_1\) to \(2, 3\), and four points of \(o\) to \(4, 5, 6, 7\) as follows.
We compute the syndrome of the set \(c_0, c_1, o_0, o_1, o_2\). That syndrome intersects with \(o\) in exactly one point \(o_j\). The we construct a permutation in \(M_{24}\) that maps the hexad \((c_0, c_1, o_0, o_1, o_2, o_j)\) to the hexad \((2, 3, 4, 5, 6, 7)\). Such a permutation exists, since both hexads are subsets of an octad.
From subtype 42 to subtype 40
Let \(\lambda_r = \lambda_d + \lambda_\delta\) be of subtype 42. Then \(d\) is an octad or a complement of an octad. We call that octad \(o\) as in the case of type 42. If that octad is grey, we map vector \(\lambda_r\) to a vector of type 40 in the same way as in that case.
Otherwise we first map the lowest four points of octad \(o\) to the set \(0, 1, 2, 3\), using a permutation in \(M_{24}\).
From subtype 40 to subtype 48
Let \(\lambda_r\) be of subtype 40. Then \(\lambda_r = \alpha \lambda_\Omega + \lambda_\delta\), \(\alpha = 0, 1\), for some \(\delta \in \mathcal{C}^*\), \(|\delta|=4\). If \(\delta\) is equal to the standard tetrad \(\omega\) represented by \(\{0,1,2,3\}\) then there is a unique power of \(\xi\) that maps \(\lambda_r\) to \(\lambda_\Omega\), which is of type 48.
Otherwise let \(c\) be the tetrad containing the point \(0\) that corresponds to \(\delta\). The we first apply a permutation in \(M_{24}\) that maps \(c\) to \(\{0,1,2,3\}\).
From subtype 21 to subtype 22, fixing \(\beta\)
Let \(\lambda_r = \lambda_d + \lambda_\delta\) be of subtype 21, and orthogonal to \(\beta\) in the real Leech lattice. Then \(|\delta| = 1\).
We proceed as in the case of subtype 43. Then there is a \(k \in \{1,2\}\) such that one column of \(w = v \cdot {\xi^k}\) (and hence all columns) have even entries. It is easy to see that \(w\) is of subtype 22.
From subtype 22 to subtype 20, fixing \(\beta\)
Let \(\lambda_r = \lambda_d + \lambda_\delta\) be of subtype 22, and orthogonal to \(\beta\) in the real Leech lattice. Then \(d\) is an octad or a complement of an octad. We call that octad \(o\) as in the cases of subtype 42 or 44. For subtype 22 the cocode word \(\delta\) can be considered as a subset of octad \(o\).
The set \(\{2,3\}\) either contained in or disjoint to octad \(o\).
If octad \(o\) is grey and even then we may directly apply a power of \(\xi\) that transforms \(\lambda_r\) to a vector of subtype 22, similar to the operation in the case of subtype 42. Otherwise we proceed as follows.
If the set \(\{2,3\}\) is disjoint from \(o\) we proceed exactly as in the case of subtype 44, replacing \(c_0\) and \(c_1\) by \(2\) and \(3\). This operation fixes the points \(2\) and \(3\).
Otherwise we first fix the points \(2\) and \(3\) and map the lowest two points of \(o \setminus \{2,3\}\) to \(0\) and \(1\), using a permutation in \(M_{24}\).
From subtype 20 to the vector \(\beta + \Omega\), fixing \(\beta\)
Let \(\lambda_r\) be of subtype 20, and orthogonal to \(\beta\) in the real Leech lattice. Then \(\lambda_r = \alpha \lambda_\Omega + \lambda_\delta\), \(\alpha = 0, 1\), for some \(\delta \in \mathcal{C}^*\), \(|\delta|=2\). In case \(\delta = \{2,3\}\) we must have \(\alpha = 1\), i.e. \(\lambda_r = \beta + \Omega\), and we are done. Otherwise both points in \(\delta\) are different from \(2\) and \(3\).
In case \(\delta = \{0, 1\}\) the transformation \(\xi^k\) with \(k = 2- \alpha\) maps \(\lambda_r\) to \(\beta\).
Otherwise we first apply a permutation in \(M_{24}\) that maps \(\delta\) to \(\{0, 1\}\), and fixes \(2\) and \(3\).
Orbits of the group \(N_{x0}\) in the group \(Q_{x0}\)
Function gen_leech2_reduce_n in file gen_leech_reduce_n.c
computes a standard representative of the orbit of a nonzero vector
in the extraspecial subgroup \(Q_{x0}\) of \(G_{x0}\) under
the action of the group \(N_{x0}\). Here \(N_{x0}\) acts on
the group \(Q_{x0}\) of structure \(2_+^{1+24}\) by
conjugation.
The quotient of \(Q_{x0}\) by its center \(\{x_{\pm 1}\}\) is isomophic to \(\Lambda / 2 \Lambda\), i.e. to the Leech lattice mod 2. So we may define the subtype of any \(v \in Q_{x0}\) as the subtype of the element \(v x_{\pm 1}\) of \(\Lambda / 2 \Lambda\).
With one exception the orbit of a nonzero vector \(v \in Q_{x0}\) under \(N_{x0}\) depends on the subtype of \(v\) only. There are exactly two elements \(x_{\pm 1}\) of \(Q_{x0}\) of subtype 00, which are of course in different \(N_{x0}\) orbits.
For each nonzero orbit of \(N_{x0}\) we choose a representative \(x_d x_\delta\), \(d \in \mathcal{P}, \delta \in \mathcal{C}^*\) (depending on the subtype of the orbit) according to the following table:
\(x_o\) is the (positive) element of the Parker loop corresponding to the stadard octad \(\{0,1,2,3,4,5,6,7\}\).
\(x_D\) is the (positive) element of the Parker loop corresponding to the stadard dodecad \(\{0,4,8, 13,14,15, 17,18,19, 21,22,23\}\).
This table can be computed by function gen_leech2_reduce_n_rep
in file gen_leechc_reduce_n.c.
Checking equality of monster elements and membership in \(2^{1+24}.\mbox{Co}_1\)
Checking equality of monster elements
For checking equality of two elements of the monster we may use two nonzero vectors \(w_{71}\) and \(w_{94}\) in the 198883-dimensional representation of the monster that are fixed by an element of order 71 and negated by an element of order 94, respectively. In [LPWW98] it is shown that only the neutral element of the monster fixes both vectors, \(w_{71}\) and \(w_{94}\). So we may check if an element is the identity in the monster. Here the corresponding calculations can be done modulo any odd prime; and we may even use different primes for the operation on \(w_{71}\) and on \(w_{94}\).
The python script mmgroup.structures.find_order_vectors.py
generates suitable vectors \(w_{71}\) and \(w_{94}\) at
random and stores data for the fast recomputation of these vectors
in file order_vector_data.py. Since we actually work in the
representation \(\rho\) of dimension 1 + 196883, we have to
make sure that the generated vectors are not fixed by the monster.
More precisely, we generate \(w_{71}\) as a vector in the representation \(\rho_3\) of the monster in characteristic 3, and \(w_{94}\) as a vector in the representation \(\rho_5\) of the monster in characteristic 5. We combine these two vectors to a vector in the representation \(\rho_{15}\) (modulo 15) of the monster via Chinese remaindering. Note that a computation in \(\rho_{15}\) is faster than the combination of the corresponding computations in \(\rho_{3}\). We write \(w\) for the vector combined from \(w_{71}\) and \(w_{94}\).
Testing membership in \(2^{1+24}.\mbox{Co}_1\)
For testing membership in \(2^{1+24}.\mbox{Co}_1\) we impose additional conditions on the vector \(w_{71}\) in the representation \(\rho_3\) defined in the last section.
For an odd number \(p\) let \(\rho_{A,p}\) be the subspace of
\(\rho_p\) spanned by the basis vectors of \(\rho_p\) with tag
A. Then \(\rho_{A,p}\) is fixed by the subgroup \(G_{x0}\)
of structure \(2^{1+24}.\mbox{Co}_1\) of the monster. A vector in
\(\rho_{A,p}\) has a natural interpretation as a symmetric bilinear
form on the Leech lattice (modulo \(p\)), see [Con85]. Let
\(Q_{p}\) be the symmetric bilinear form on the Leech lattice
(modulo \(p\)) given by the scalar product; then \(Q_{p}\)
is given by the the \(24 \times 24\) unit matrix, up to a
scalar factor.
Let \(w\) be a vector in \(\rho_{15}\) as in the last section. For any \(w\) in \(\rho_{p}\), let \(w_{(A,p)}\) be the bilinear from on the Leech lattice (modulo \(p\)) corresponding to the projection of \(w\) onto \(\rho_{A,p}\). We shall search for a vector \(w\) satisfying the condition stated an the last section. In addition we require that for some integer \(d\) (modulo 3) the bilinear form \(w_{(A,3)} - d \cdot Q_3\) has a kernel of dimension one, and that this kernel contains a type-4 vector \(x_4\) of the Leech lattice modulo 3.The chance of finding such a vector \(w\) is discussed in [Sey22], Appendix B. In average, finding a suitable vector \(w\) take less than a minute on the author’s compute, when running with 12 processes in parallel.
Let \(\Omega\) be the standard frame of
the Leech lattice (modulo 3). Then \(\Omega\) is of type 4
and consists of the vectors \((0,\ldots,0,\pm 1,0,\ldots,0)\).
Once we have found a suitable vector \(w\), we
apply a transformation in \(G_{x0}\) to \(w\) that
maps the frame in the Leech lattice given by \(x_4\) to
\(\Omega\). Therefore we work in the Leech lattice modulo 2, as
described in section Computations in the Leech lattice modulo 2. Conversion from a
type-4 vector in the Leech lattice mod 3 to a type-4 vector in the
Leech lattice mod 2 is easy; the C function gen_leech3to2_type4
in file gen_leech3.c does that job. In the sequel we also write
\(w\) for the transformed vector. So we may assume that the
kernel of \(w_{(A,3)} - d \cdot Q_3\) is one dimensional and
spanned by a vector in the standard frame \(\Omega\) of the
Leech lattice modulo 3.
For doing linear algebra in \(\mathbb{F}_3\) we store a vector of 16 integers modulo 3 in a 64-bit integer; and we use arithmetic, Boolean and shift operations.
Assume that \(g\) is in \(G_{x0}\). Then the kernel of \(w_{A,3} \cdot g - d \cdot Q_3\) is spanned by a vector in the frame \(\Omega \cdot g\). So we may also compute \(\Omega \cdot g\) in the Leech lattice modulo 2. Using the methods in section Computations in the Leech lattice modulo 2 we can compute a \(h_1\) in \(G_{x0}\) that maps \(\Omega \cdot g\) to \(\Omega\). So \(gh_1\) fixes \(\Omega\). Hence \(gh_1\) is in the subgroup \(N_{x0}\) of structure \(2^{1+24+11}.M_{24}\) of \(G_{x0}\).
The factor group \(M_{24}\) of \(N_{x0}\) acts on the \(24 \times 24\) matrix representing the bilinear form \(w_{(A,p)}\) by permuting the rows and the columns, up to changes of signs that we will ignore at the moment. So we store the multiset of the absolute values of the entries of each row of the matrix \(w_{(A,p)}\). Then \(M_{24}\) permutes these 24 multisets by its natural action. So we may recover the element of \(M_{24}\) performing that action and compute a preimage \(h_2\) of the inverse of that element in \(N_{x0}\). Thus \(gh_1 h_2\) is in the subgroup \(2^{1+24+11}\) of \(N_{x0}\). Note that, originally, the vector \(w\) has been defined modulo 15, so that almost certainly we have enough information in the matrix \(w_{(A,15)}\) to compute the permutation in \(M_{24}\). In the implementation we compute a hash function on the 24 multisets obtained from the rows of \(w_{(A,15)}\), and we generate a new vector \(w\) if these 24 hash values are not mutually different.
Now that task of reducing an element of \(2^{1+24+11}\) is easy.
We first eliminate the factor \(2^{11}\) be checking signs
in \(w_{(A,15)}\), or signs of suitable entries of vector
\(w\) with tag A, which is the same thing. Then we
eliminate the factor \(2^{24}\) be checking signs of suitable
entries of \(w\) with tags B, C, T, X, and, finally, the
factor \(2^{1}\) by checking a sign of an entry with
tag Y or Z.
So we obtain a decomposition \(g h_1 h_2 h_3 = 1\), with \(h_i\) in a transversal of \(G_i / G_{i+1}\) for \(G_1 = G_{x0}\), \(G_2 = N_{x0}\), \(G_3 = 2^{1+24+11}\), \(G_4 = \{1\}\). If \(g \notin G_{x0}\) then this procedure fails in one of the steps mentioned above. We abort as early as possible in case of failure, in order to accelerate functions searching for an element of \(G_{x0}\) that have a low probability of success.
Module mmgroup.dev.mm_reduce.find_order_vector.py contains
a function for finding a suitable vector \(w\). Once a
vector \(w\) has been found, it creates a module
mmgroup.dev.mm_reduce.order_vector_data.py containing
information for recomputing the same vector \(w\)
more quickly. The code generation process creates a C file
mm_order_vector.c containing the vector \(w\)
in its source code together with some data required for
using \(w\) and for checking its correctness.
We believe that this method simplifies the integration of
our project into computer algebra systems like GAP or Magma,
since these systems may now simply call C functions for
computing in the monster group, without bothering how to
generate a suitable vector \(w\).
Subgroups of the Mathieu group \(M_{24}\)
An amalgam of many (mostly 2-local) large subgroups of the Monster \(\mathbb{M}\) has been constructed in [Iva09]. For each of these subgroups (and, hopefully, also for their intersections) we want an algorithm that constructs an (almost) uniform random element of that group. This is a complicated task, which might not even be possible for all cases. As a first step towards this goal we will describe the intersections of some subgroups of the Mathieu group \(M_{24}\). These subgroups of \(M_{24}\) are involved in the subgroups of \(\mathbb{M}\) in the amalgam. We will also give some information how to construct ramdom elements of these subgroups of \(M_{24}\) and of their intersections.
TODO: This section is yet a fragment and will be completed in a future version.
Some subgroups of the the Mathieu group \(M_{24}\)
We define some subgroups of the Mathieu group \(M_{24}\) as the stabilizers of certain subsets (or sets of subsets) of the set \(\tilde{\Omega} = \{0,\ldots,23\}\), as shown in the following table:
All these groups, except for \(M_l\), are maximal subgrous of \(M_{24}\) and discussed in [CS99], Ch. 11. The structure of \(M_l\) (as a subgoup of \(M_o\)) is described in [Iva09] in the text after Lemma 4.1.3. The central element of \(M_l\) of order 2 is obtained by exchanging all entries \(2i\) with \(2i+1\) for \(i \geq 4\). We have the following inclusions:
Membership of an element of \(M_{24}\) in any of these subgroups
can easily be checked computationally. Thus an inclusion of two
intersections of these subgroups can be disproved computationally by
finding an element of \(M_{24}\) contadicting that inclusion.
This computation is done in function test_mat24_rand in module
mmgroup.tests.test_mat24 during the standard test.
In the remainder of this subsection we will prove the inclusions given above. The first inclusion is obvious. Next we justify the following two inclusions.
By [CS99], Ch. 11, the group \(M_o\) acts on the octad \(o = \{0,\ldots,7\}\) as the alternating group \(A_8\), and on the complement \(\bar{o}\) of \(o\) as the affine group on \(\mathbb{F}_2^4\). Here the affine structure of \(\bar{o}\) is given by the last 4 digits of the binary representations of its entries. Fixing e.g. the element 8 of \(\bar{o}\), the set \(\bar{o}\) acquires the structure of the linear space \(\mathbb{F}_2^4\); and we obtain the well-known isomorphism \(L_4(2) \cong A_8\). Subspaces of dimension 1, 2, and 3 of the linear space \(\mathbb{F}_2^4\) will be called lines, planes, and hyperplanes.
We have following correspondences between \(o\) and its complement \(\bar{o}\)
These correspondences (except for the last) are stated in
[CCN+85]. For the last correspondence we refer to
[CS99], Ch. 10.1.4. The tetrads of a Steiner system
corresponding to a line or a hyperplane are the tetrads in the
sextets corresponding to the planes incident with that line
or hyperplane; here we take tetrads that are subsets of
octad \(o\) only. Methods for computing with these objects
are presented in [CS99], Ch. 11, and implemented in file
mat24_functions.c.
Let \(f\) be the symplectic form on \(\mathbb{F}_2^4\) corresponding to a pair \(y\) of elements of \(o\). For two different nonzero elements \(x_1, x_2\) of \(\mathbb{F}_2^4\) let \(s\) be the sextet corresponding to the plane generated by \(x_1\) and \(x_2\), and let \(\tau\) be a tetrad in \(s\) which is a subset of \(o\) . Then the scalar product \(x_1\) and \(x_2\) with respect to \(f\) is the size of the set \(y \cap \tau\) (modulo 2).
Let \(l' = \{8,9\}, s'= \{8,9,10,11\}\) and \(t' = \{8,\ldots,15\}\). Then the line \(l'\), the plane \(s'\), and the hyperplane \(t'\) are mutually incident. A staightforward calculation using the facts stated above shows that \(t'\) is the orthogonal complement of \(l'\) with respect to the symplectic form \(f'\) corresponding to the subset \(\{2,3\}\) of \(o\). Obviously, \(M_t \cap M_2 subset M_o\). So this proves \(M_l \cap M_2 \subset M_t\) and \(M_t \cap M_2 \subset M_o \cap M_l\).
Next we will show the last three inclusions listed above. The group \(M_3\) fixes the set \(y= \{1,2,3\}\). We have \(M_3 \cap M_l \subset M_o\), so \(M_3 \cap M_l\) fixes a Steiner system in \(o\), an it turns out the the set \(\{0,1,2,3\} \supset y\) is in that Steiner system. This proves \(M_3 \cap M_l \subset M_s\). We obviously have \(M_3 \cap M_t \subset M_o\), and hence \(M_3 \cap M_t\) fixes another Steiner system in \(o\). Here the set \(\{0,1,2,3\}\) is also in this Steiner system, implying \(M_3 \cap M_t \subset M_o \cap M_s\).
The group \(M_t \cap M_l\) fixes a line incident with a hyperplane in \(\mathbb{F}_2^4\). Hence it fixes a partition of \(o\) into four unordered pairs, and it turns out that the set \(u\) of these pairs is \(\{ \{2i, 2i+1\} \mid 0 \leq i < 4 \}\). Thus \(M_3 \cap M_t \cap M_l\) fixes \(u\) and \(y\), and hence also the set \(\{2,3\}\). This proves \(M_3 \cap M_t \cap M_l \subset M_2\).
Some 2-local subgroups of the Monster
The subgroups of \(M_{24}\) constructed above are involved in some large subgrups of the Monster as described in the following table.
TODO: More details will be given in a future version.
Installation from a source distribution
The current version of the mmgroup package is a source distribution
that has been tested on a bit Windows, Linux and macOS with a
64-bit x86 CPU. It runs with python 3.8 or higher. The sources of the
project can be downloaded from
https://github.com/Martin-Seysen/mmgroup .
We use the python package cibuildwheel to build several wheels on
these operating systems. The GitHub repository of the project contains
actions to build the corrsponding python wheels. The program code for
the GitHub actions is stored in subdirectory .github/workflows.
More details about the build process are given in
section The build process.
The mmmgroup package contains a number of extensions written
in C which have to be built before use. This will be discussed
in section Code generation.
Building the mmgroup package with cibuildwheel
The easiest way to build the mmgroup package is to clone the sources
from the github repository with git, and to build a python wheel
with cibuildwheel. Therefore, the cibuildwheel tool must support
your target platform. In the sequel we assume that python and the git
revision control system are installed on your platform.
We describe the build process on a unix-like platform.
Depending on your platform, you might have to install additional tools. For details we refer to the cibuildwheel docmentation https://cibuildwheel.readthedocs.io/en/stable/
Any previously installed version of the mmgroup package must
be uninstalled before building a new version of that package!
The current build system supports native compilation only. Cross compilation is not supported.
E.g. for building the mmgroup package for python 3.12 on Linux
with a 64-bit x86 CPU, open a shell and type:
pip3 install cibuildwheel
git clone https://github.com/Martin-Seysen/mmgroup
cd mmgroup
git pull origin master
git checkout .
python3 -m cibuildwheel --output-dir wheelhouse --only cp312-manylinux_x86_64
The last command builds the python wheel. For building the wheel on a different platform, the argument ‘cp312-manylinux_x86_64’ in the last command should be replaced by a build identifier that describes the requested python version and target platform. A list of valid build identifiers is given in Section ‘Options/build selection’ of the cibuildwheel documentation, see
https://cibuildwheel.readthedocs.io/en/stable/options/#build-skip
After building the python wheel, switch to subdirectory wheelhouse, and check the file name of the wheel that has been built:
cd wheelhouse
ls
Then you may install the wheel with pip, e.g.:
pip3 install mmgroup-0.0.13-cp312-cp312-manylinux_2_17_x86_64.manylinux2014_x86_64.whl
Here the file name after the pip3 install command must be changed to the file name of the wheel just generated.
You should test your installation of the mmgroup package before
using it:
pip3 install pytest
python3 -m pytest --pyargs mmgroup -m "not slow"
Dependencies
Before you can use this source distribution or build its extensions you should install the following python packages:
Package |
Purpose |
|---|---|
|
Development: integrating |
|
Runtime: Most arrays used by the |
|
Distribution: package for generating a Python wheel |
|
Testing: basic package used for testing |
|
Development: parsing balanced curly braces |
|
Development: basic package used for setup and building extensions |
|
Development: build wheel in continuous integration process |
|
Development (Linux and macOS only): patching shared libraries |
|
Documentation: basic package used for documentation |
|
Documentation: ‘theme’ to be used by sphinx |
|
Documentation: bibliography in BibTeX style |
|
Documentation: link between |
|
Documentation: link between |
Packages used for the purpose of documentation are required only if you want to rebuild the documentation. If you want to rebuild the documentation you should also install the following programs:
Program |
Purpose |
Location |
|---|---|---|
miktex |
Documentation |
|
Perl |
Documentation |
|
doxygen |
Documentation of C files |
|
Ghostcript |
Documentation: using TikZ in Sphinx |
Installing the package
To build the required package on your local computer, go to the root directory
of the distribution.
This is the directory containing the files setup.py and README.rst.
From there run the following commands in a shell:
python -m pip install -r requirements.txt
python setup.py bdist_wheel
In Linux or macOS you’ll have to change the python command to python3.
For testing the installation, run the following command:
python -m pytest ./src/mmgroup/ -Wignore -v -s -m "not slow"
Distributing a wheel is the standard way to distribute a python package, see e.g.
https://packaging.python.org/guides/distributing-packages-using-setuptools/#wheels
Remarks
If you have installed any version of the mmgroup package (e.g. with
the pip tool) then you must uninstall that package before you can
build a new version of the mmgroup package from the source files.
Installing a C compiler for cython in Windows
The bad news for Windows developers is that there is no pre-installed
C compiler on a standard Windows system. However, the cython
package requires the C compiler MSVC.
The user has to install a C compiler so that it cooperates with
cython.
That installation process is out of the scope of this document.
For installing MSVC, one might start looking at
https://wiki.python.org/moin/WindowsCompilers
The author has installed the MSVC compiler with the Microsoft
Build Tools for Visual Studio from:
https://visualstudio.microsoft.com/thank-you-downloading-visual-studio/?sku=BuildTools&rel=16 ,
following the instructions in
https://www.scivision.dev/python-windows-visual-c-14-required/ .
Before typing python setup.py bdist_wheel in a Windows command
line the author had to type:
"C:\Program Files (x86)\Microsoft Visual Studio\2019\BuildTools\VC\Auxiliary\Build\vcvars64.bat"
Here the path my be different on the user’s Windows system.
The build process
Warning! At present the build process is under construction.
We plan to switch to the Meson build system. The reason for this
is that invoking setup.py from the command line is deprecated.
Meson requires a much more declarative style for describing the
build operations.
Thus the description here is pretty much outdated!
The standard build process for python packages is based on the
setuptools package. We use setuptools to build the mmgroup
package. We have added the following functionality
to the standard build process:
The user may call arbitrary functions or processes, e.g. for the automatic generation of C code.
The user may add a shared library that may be used by several extensions.
Module build_ext_steps in the root directory contains the
python classes required for that extension. The following table
lists some important modules in the root directory.
Files in the root directory used by the build process File name
Purpose
build_ext_steps.pyExtension for the
setuptoolspackage
build_shared.pyTool for building a shared library
cleanup.pyClean up intermediate files
config.pyA configuration file of the project
generate_code.pyTool for generating C code
MANIFEST.inList of files to be added to the source distribution
pyproject.tomlMain configuration file for the project
README.rstMain documentation file for GitHub
setup.pyMain file for the build process with
setuptools
Creating a new version
The ultimate goal of building a new version is to upload a new python version to the pypi server.
At present we will upload a source distribution and python 3 wheels for 64-bit Windows, Linux and macOS, say, for the latest two or three python versions.
Before creating a new version, (at least) the following test should be executed in a shell in Windows 64, and also in some Linux version:
pytest src/mmgroup/ -v -s -m "very_slow"
Version numbering
We assume that we want to create Version 0.0.8 at date 2022-07-12, with the short version description ‘Performance improved’.
You should update the version number in file setup.py by writing e.g:
VERSION = '0.0.8' # 2022-07-12. Performance improved
into that file. You should also comment out older version descriptions in that file. In section Version history of file docs/source/api.rst you should add the following line to the version history:
| Version 0.0.8, 2022-07-12. Performance improved
Then you should upload the new version with these changes to the
master branch in the github repository:
https://github.com/Martin-Seysen/mmgroup
After uploading, you should create a new release in the github repository. Therefore, click Create a new release in main page of the github repository. Here you should write the tag v0.0.8 into the field Choose a tag. The Target of the release should be master, referring to the master branch in git. You should enter the title mmgroup v0.0.8 into the field Release title. We recommend to enter (at least) the version description (which is ‘Performance improved’ in our case) into the field Describe this release. Finally, you should click the button Publish release in the github window.
Generating the wheels
This subsection describes how to create wheels manually. This process
has now been automated to some extent by using GitHub actions
that trigger the python tool cibuildwheel. So the reader may skip
this section.
Here you must generate a wheel for each python version, and also for each operating system that you want to support. Here we assume that Anaconda is used for creating wheels for Windows 64 for various python versions. An Anaconda environment e.g for python 3.9 is created by typing the following command
conda create --name python39 python = 3.9
Then we may switch to that python version by typing:
conda activate python39
Environments for other python versions are created similarly. One has to install all required python packages for each version. For uploading a version to pypi we also have to install twine with
pip install twine
In each version to be supported we have to type:
python setup.py build_ext bdist_wheel
python setup.py sdist
Here the first line creates the wheel for the selected python version. Before doing so in Windows, you must install a C compiler for cython as described in section Installation from a source distribution.
The second line creates a source distribution; this must be done
only once. The wheels and source distributions are stored in
subdirectory dist. The wheel for mmgroup version 0.0.8 for python
3.9 has a name similar to mmgroup-0.0.9-cp37-cp37m-win_amd64.whl;
and the source distribution has a name like mmgroup-0.0.8.zip.
Uploading the version to pypi
You may upload the new version with the following commend:
twine upload twine upload dist/*
This uploads all files from subdirectory dist to pypi. So you’d better cleanup that directory before uploading.
Warning
Uploading with twine is irreversible. If your uploaded version is buggy, you will have to create a new version!
Description of module build_ext_steps.py
Module build_ext_steps provides a customized version of
the ‘build_ext’ command for setup.py.
It should be placed in the same directory as the module setup.py.
Distributing python packages
The standard toolkit for distributing python packages is the
setuptools package. Here the user types:
python setup.py build_ext
at the console for building the extensions to the python package, which
are typically written in a language like C or C++ for the sake of speed.
We may use e.g. the Cython package to write python wrappers for the
functions written in C or C++. The setuptools package supports the
integration of Cython extensions.
The setup.py script describes a list of extensions, where each
extension is an instance of class Extension which is provided
by setuptools. Then it calls the setup function which builds
all these extensions:
from setuptools import setup
from setuptools.extension import Extension

ext_modules = [
    Extension(
        ...  # description of first extension
    ),
    Extension(
        ...  # description of second extension
    ),
    ...
]

setup(
    ..., # Standard arguments for the setup function
    ext_modules = ext_modules,   # List of extensions to be built
)
We assume that the reader is familiar with the standard python setup process. For background, we refer to
Added functionality for building python packages
This build_ext_steps module supports a new paradigm for building a
python extension:
A python program
make_stage1.pycreates a C programstage1.c.We create a python extension
stage1.so(orstage1.pydin Windows) that makes the functionality ofstage1.cavailable in python.A python program
make_stage2.pycreates a C programstage2.c. Heremake_stage2.pymay importstage1.so(orstage1.pyd).We create a python extension that makes the functionality of
stage2.cavailable in python.etc.
This paradigm is not supported by the setuptools package.
Using class BuildExtCmd for the new paradigm
For using the new building paradigm we have to replace the standard
class build_ext by the class build_ext_steps.BuildExtCmd.
from setuptools import setup
from build_ext_steps import Extension
from build_ext_steps import BuildExtCmd

ext_modules = [
    # description of extension as above
]

setup(
    ..., # Standard arguments for the setup function
    ext_modules = ext_modules,   # List of extensions to be built
    cmdclass={
       'build_ext': BuildExtCmd, # replace class for build_ext
    },
)
This change has a few consequences:
It is guaranteed that the extension are build in the given order
Extensions are always build in place (option
build_ext --inplace) (The current version does not support building the extension in a special build directory.)The building of all extensions is now forced (option
build_ext --f), regardless of any time stamps.
Apart from these changes, an extension is created in the same way
as with setuptools.
For a documentation of the Extension class in the setuptools
package, see
https://docs.python.org/3/distutils/apiref.html?highlight=extension#distutils.core.Extension
Inserting user-defined functions into the build process
Module build_ext_steps provides a class CustomBuildStep
for adding user-defined functions to the build process.
In the list ext_modules of extensions, instances of class
CustomBuildStep may be mixed with instances of class Extension,
Class CustomBuildStep models an arbitrary sequence of functions to
be executed.
The constructor for that class takes a string ‘name’ describing the action of these functions, followed by an arbitrary number of lists, where each list describes a function to be executed.
Here the first entry should be a string. Then a subprocess with that name is called. Subsequent entries in the list are arguments passed to the subprocess.
If such an argument contains the string ‘${build_lib}’ then that string
is replaced by the name of the root directory of the path where the
extionsion is to be built. If the ‘build_ext’ command of setup.py
is invoked with the ‘–inplace’ option then the string ‘${build_lib}’
is replaced by ‘null’.
Such a subprocess may be e.g. a step that generates C code to be used for building a subsequent python extension.
Its recommended to use the string sys.executable (provided
by the sys package) instead of the string 'python' for
starting a python subprocess.
The following functionality is deprecated:
If the first entry of a list as descibed above is a python function then that function is called. Subsequent entries in the list are passed as arguments to the function.
Using an extension in a subsequent build step
Once a python extension has been built, it can also be used in a subsequent step of the build process, e.g. for calculating large arrays of constants for C programs. Details are out of the scope of this documentation..
Code generation
Warning! At present the code generation process is under construction.
We plan to switch to the Meson build system. Therefore a much more
declarative style is required for describing the code generation.
Also, a strict separation between input and output directories is
required.
Thus the description here is pretty much outdated!
The main code generation tool generate_code.py
An invocation of the main code generation script generate_code.py generates a set of .c files and also a single .h file from a set of source files. Here each .c file is generated from a single source file which has extension .ske. Prototypes for the functions in the .c files may also be generated form these source files; they are copied into the generated .h file. The user may also specify a source file with an extension .h. Such a .h file usually contains global declarations; and it is also copied into the generated .h file.
The user may also specifiy a set of python modules to be used for
code generation with the --tables option. Any such module must
have a class Tables containing information how to enter tables
and code snippets into the generated C code. The structure of such a
code-generating module is described in the next section.
We use the Cython language to integrate the generated .c file into
our python project. In a Cython project, a .pxd file should be
generated from a header file. Here the .pxd file contains essentially
the same information as the header file. The --pxd option generates
a .pxd file from the generated header file automatically. Here the user
may specify a source file (with extension .pxd), which will also be
copied into the generated .pxd file.
The user may also create a .pxi file from the .pxd file with the
--pxi option . Such a .pxi file will contains wrappers for the
C functions declared in the .pxi file. These wrappers can be used
directly from python by including the .pxi file into a .pyx file
that defines a Cython extension. Note that this automatic wrappping
mechanism works for rather simple prototypes only.
With the --pyx option, the user may simply copy a .pyx file from
the source path to a destination directory.
The Meson build system requires strict separation between the input and the output directory. The user may specify a path where to look for the input files (with extensions .ske, .h, .pxd, and .pyx). The user may specify a directory where to store the generated .c and .h files; and also a directory where to store the generated .pxd, .pyi, and .pyx files.
In the following table we list the options available in the generate_code.py tool.
-h, --help            show this help message and exit
--sources [SOURCE ...]
                      List of SOURCE files to be generated. For each
                      SOURCE with extension '.c' a '.c' file is
                      generated from a file with the same name and
                      extension '.ske'. A SOURCE with extension '.h' is
                      copied into the common header file. Each SOURCE
                      is seached in the path set by parameter '--
                      source-path'. Output is written to the directory
                      set by parameter '--out-dir'.
--out-header HEADER   Set name of output header file to HEADER. By
                      default we take the first file with extension .h
                      in the list given in the argument '--sources'.
--pxd PXD             Set input '.pxd' file PXD for generating '.pxd'
                      file with same name from that input file and from
                      the generated header.
--pxi                 Generate '.pxi' file from '.pxd' file if this
                      option is set.
--pyx PYX             Copy input '.pyx' file PYX from source path to
                      output directory.
--tables [TABLES ...]
                      Add list TABLES of table classes to the tables to
                      be used for code generation.
--set VAR=VALUE [VAR=VALUE ...]
                      Set variable VAR to value VALUE. When generating
                      code with subsequent '--sources' options then the
                      table classes will set VAR=VALUE.
--subst [PATTERN SUBSTITUTION ...]
                      Map the name of a '.c' or '.h' file to be
                      generated to the name of a file used as a source
                      for the generation process. Example: "--subst
                      mm(?P<p>[0-9]+)_op mm_op" maps e.g.'mm3_op' to
                      'mm_op'. We substitute PATTERN in the name of a
                      generated file by SUBSTITUTION for obtaining the
                      name of that source. The part "(?P<p>[0-9]+)"
                      creates a variable 'p' that takes the decimal
                      string following the intial letters 'mm' in the
                      file name. Then variable 'p' will be passed to
                      the table classes used for code generation.
                      PATTERN must be given in python regular
                      expression syntax.
--source-path [PATHS ...]
                      Set list of PATHS for finding source files to be
                      used for generation process.
--py-path [PATHS ...]
                      Set list of PATHS for finding python scripts
--out-dir DIR         Store output files with extensions .c and .h in
                      directory DIR.
--out-pxd-dir DIR     Store output files with extensions .pxd, .pxi,
                      and .pyx in directory DIR.
--dll DLL_NAME        Generate code for exporting C functions to a DLL
                      or to a shared library with name DLL_NAME.
                      Parameter DLL_NAME must be the same for all
                      generated C files to be placed into the same DLL.
                      This parameter is not used for any other
                      purposes.
--nogil               Optional, declare functions from .pxi file as
                      'nogil' when set.
--mockup              Use tables and directives for Sphinx mockup if
                      present
-v, --verbose         Verbose operation
Python modules used for code generation
In the main code generation tool generate_code.py the user may specify
a list of python modules to be used for code generation. Any such module
must have a class Tables that contains two dictionaries tables and
directives to be used for code generation. Both of these dictionaries
map identifiers to objects implementing tables or directives to be used in
the code generation process. Here the identifiers should be valid python
identifiers beginning with an alphabetic character. If several code
generation modules are specified then the corresponding dictionaries in
the Tables classes of these modules are merged into a single
dictionary.
Dictionary tables maps identifiers to values. If we have
e.g. tables[P] = 3 then the expression %{P} in a source file
with extension .ske evaluates to the string 3 in the generated .c
file. More elaborated use cases for the tables dictionary are given
in the following sections. A value in the tables dictionary may also
be a list of integers; then there ia a way to to initialize an array of
integers in the generated .c files with these integer values.
Dictionary directives maps identifiers to directives. Invoking
such a directive in a source file causes the code generator to put
a code snippet into the generated .c file. Here a typical use case is the
multiplication of a part of a vector of the representation of the Monster
group with a fixed matrix.
A class Tables as described above should accept arbitrary keyword
arguments in the constructor. (A standard way to do this is to
provide a parameter **kwds in the constructor.) The
generate_code.py tool may pass such keyword arguments to
the constructor of a class Tables either with the --set
option or with the --subst option. Using the --set option
is straightforward. Using --subst is a bit more involved.
The following paragraph provides an example for using the --subst
option.
The source file mm_op_pi.ske supports certain oparations of the
Monster group on vectors modulo several small odd numbers p. The
module mm_op_pi.py provides a class Tables that supports
the generation of code snippets to be used in these operations.
From the source file mm_op_word.ske we want to generate files
mm3_op_pi.c, mm7_op_pi.c, … etc. for the operation modulo
3, 7, …, etc. In the corresponding code generation process there
is an option
--subst mm(?P<p>[0-9]+)_op mm_op
that primarily describes a subtitution of strings that maps both,
mm3_op_pi, and mm7_op_pi to mm_op_pi. So this
substitution maps the name of a generated .c file to the name of a
.ske file (without extension) from which that .c file is to be
generated. The first argument mm(?P<p>[0-9]+)_op of the
--subst option is the pattern to be substituted given in the
standard python regular expression syntax. Note that the part
(?P<p>[0-9]+) of that argument also creates a
dictionary {'p' : '3'} mapping identifier ‘p’ to the string
‘3’, when we substitute the name mm3_op_pi using this pattern.
When such a dictionary is created, the code generation tool
passes the keyword argument p = '3' to the constructor of
every class Tables used for the generation of file
mm3_op_pi.c. This way the the Tables classes can be
instructed to generate code snippets for operation modulo 3.
Generation of code snippets and tables
In this section we describe the most important functions and classes used for the automatic generation of C code.
The C code generator generates code from a source file automatically.
Class TableGenerator can be used to generate a
.c and a .h file from source file. Here such a source file usually
has the extension .ske.
Basic idea: We copy a source file to the .c file. The source contains directives to enter precomputed tables, code snippets or constants into the .c file, and prototypes into the .h file.
We copy the content of the source file directly to the .c file. In the source file we also parse certain directives and we replace them by automatically generated code snippets in the .c file and in the .h file.
The arguments given to the constructor of class TableGenerator
specify the meaning of the directives.
Overview
In the source file we parse directives of the shape:
// %%<keyword> <arg1>, <arg2>, ...
Each directive executes certain function associated to the
<keyword>. There are built-in and user-defined directives.
Built-in directives are listed in section Built in directives.
User-defined directives are passed to the constructor in a
dictionary directives with entries:
<keyword> : <directive_function>.
If a directive is found in the source file we call:
<directive_function>(*<all evaluated arguments>),
and the string returned by that function is merged into the
generated .c file. The arguments of a directive must be given
in python syntax and they are evaluated to python objects using
some safe version of the python eval() function. Basically,
python identifiers in an argument are evaluated as follows:
In the constructor, parameter tables is a dictionary of local
variables, which will be passed to the python eval() function
for evaluating an argument. See section Arguments of directives for
a more detailed description of this process.
You may also consider class UserDirective
for constructing specific directive functions.
Arguments of directives
The comma-separated list of arguments of a built-in or user-defined
directive or function must be a valid python expression. This
expression is evaluated by a safe version of the python eval()
function, with the local variables given by the dictionary
names.
Here names is an updated version of the dictionary tables
of local variables passed in the constructor of this class as
described below. This means that each identifier found in the list
of arguments is looked up in that dictionary, and that the identifier
is evaluated to the corresponding value in that dictionary.
The dynamic dictionary names is initialized with dictionary
tables. It may be updated with the names of the tables generated
by the built-in directive TABLE, as indicated in the
description of the built-in directive USE_TABLE.
There are a few more predefined entries in dictionary names:
name |
value |
|---|---|
|
The original dictionary |
|
updated version of dictionary |
Evaluating a python expression with the standard function eval()
is known to be unsafe. For evaluating arguments we use a modified
version of the eval() function. That modified function does not
allow assignment, and identifiers starting with an underscore _
are illegal. See function EvalNodeVisitor in module
mmgroup.generate_c.generate_functions. for details.
There is a limited number of built-in python functions (specified
in directory safe_locals in the same module) that are
legal in python expressions for arguments:
abs, int, len, max, min, str, pow, range, zip
An example with user-defined directives is given in class
testcode.TestGen. We recommend to follow the conventions in that
class for passing user-defined directives to an instance of class
TableGenerator.
Built-in directives
COMMENT, deprecated!Indicates that a comment follows. This should be used only for comments relevant for the user, not for internal details. No action in this class, but other functions may use this directive for generating user documentation.
ELSE [IF]?<expression>else clause for IF directive, see
IF
END<directive>Closes a block that has been started by one of the directives
FORorIF. AFORblock must be closed withEND FOR, anIFblock must be closed withEND IF, etc.
ERROR<message>TODO: yet to be implemented and documented!!!!
EXPORT(arguments see below)Then the following line with an appended semicolon is copied into the generated .h file. This is useful for creating prototypes. The
EXPORTdirective may precede a line with aUSE_TABLEdirective. Then the table name captured by the nextUSE_TABLEstatement is exported to the generated .h file. TheEXPORTdirective may precede a line with aDEFINEfunction. Then the #define statement generated by the next DEFINE function is written to the generated .h file.An optional argument
pmeans that the exported line will also be included in a .pxd file, see methodgenerate_pxd().An optional argument
pxorxpmeans that the same as argumentp. Then in addition we also write a comment# PYX <wrap pxi>into the .pxd file generated by methodgenerate_pxd(). If functionmmgroup.generate_c.pxd_to_pyxreads such a comment in a .pxd file, it will write a simple wrapper for the exported function into a .pyx file.
EXPORT_KWD<keyword>The directive:
// %% EXPORT_KWD FOO_APIplaces the keyword FOO_API before any function or variable which is exported with the
EXPORTorEXPORT_TABLEdirective. This is useful on a MS Windows system for creating a dll. Then the header should contain a definition similar to:#define FOO_API __declspec(dllexport)This declares these functions or variables to be exported by the dll. For background, see e.g. https://gcc.gnu.org/wiki/Visibility.
EXPORT_TABLE(no arguments)Parses the next input line for the C-name of a table, and exports this name into the generate .h header file. This is equivalent to two subsequent directives:
EXPORT
USE_TABLE
There are, however, subtle differences, see directive
EXPORT_KWD.
FOR<variable>in<parameter_list>Generate a sequence of blocks of statements, one block for each parameter in the parameter_list. A sequence of arbitrary lines follows, terminated by an
END FORdirective. The parameter list is evaluated to a python object which should be iterable.Nesting of FOR and similar directives is possible.
Examples:
// %%FOR x in range(1,3)
i%{x} += 2*%{x};
// %%END FOR
evaluates to:
i1 += 2*1;
i2 += 2*2;
GEN<ch>Directs output to .c or to .h file or to both, depending on whether the letter c or h is present in the first argument.
IF<expression>Conditional code generation depending on the boolean value of <expression>. Syntax is:
// %%IF <expression>
<statements>
// %%ELSE IF <expression>
<statements>
// %%ELSE
<statements>
// %%END IF
with one or more optional
ELSE IFclauses and at most one finalELSEclause. NestedIFandFORblocks are possible.
INCLUDE_HEADERSThis directive is legal in a header file with extension
.honly. A typical header file may look like this:#ifndef _THIS_HAEDER_HAS_ALREADY_BEEN_PROCESSED_ #define _THIS_HAEDER_HAS_ALREADY_BEEN_PROCESSED_ // Some prototypes for C functions will be inserted here #endifThe code generator may insert automatically generated prototypes for C functions into that header. You can tell the code generator where to insert these prototypes as follows:
#ifndef  _THIS_HAEDER_HAS_ALREADY_BEEN_PROCESSED_
#define  _THIS_HAEDER_HAS_ALREADY_BEEN_PROCESSED_

// %%INCLUDE_HEADERS

#endif
JOIN<infix>, <suffix>A
FORdirective must follow aJOINdirective. The expressions generated by the followingFORdirective are joined with the <infix> (which is usually an operator), and the <suffix> is appended to the whole generated expression. E.g.:a += // %%JOIN* " +", ";" // %%FOR* i in range(1,4) %{int:2*i} * table[%{i}] // %%END FORevaluates to:
a +=
  2 * table[1] +
  4 * table[2] +
  6 * table[3];
PY_DOCSTR<string>, <format>This directive is no longer supported
PYX<string>This directive is no longer supported
into the .pxd file, when generating a .pxd file. This has no effect on the generated .c or .h file. It may be used for automatically generating a .pyx file from a .pxd file.
TABLE<table>, <format>Enters all entries of the python array <table> into the C code as an array of constants with an optional <format>. Only the data of the array are written. Feasible <format> strings are given in function format_number().
USE_TABLE(no arguments)Parses the next input line for the C-name of a table and makes that C name available for user-defined directives.
If a table is coded with the
TABLEdirective and preceded by aUSE_TABLEorEXPORT_TABLEdirective then the name of that table will be added to the dictionarynames. The key with the python name of that table will have the C name of that table as its value.Consider the following example:
1:    // %%USE_TABLE
2:    int  C_table[]  = {
3:       // %%TABLE python_table, uint32
4:    }
Here
'python_table'must be a key in the dictionarytablespassed to the constructor of classTableGenerator. The value for that key should be a list of 32-bit integers. Then the directive in line 3 creates the list of integer constants given by the listtables[python_table].The
USE_TABLEdirective in line 1 has the following effect. In the sequel the entrynames['python_table']has the value'C_table', which is the C name of the table that has been generated. So we may use that entry in subsequent directives or via string formatting with curly braces.The entries of table
python_tableare still available in the formpython_table[i]as before.python_table[:]evaluates to the whole table as before.
WITH<variable> = <value>Temporarily assign <value> to <variable>. A sequence of arbitrary lines follows, terminated by an
END WITHdirective. Both, <variable> and <value>, may be tuples of equal length; a nested tuple <variable> is illegal. The <variable>, or the variables contained in the tuple <variable>, are temporarily added to the dictionarynamesas keys, to that they can be used via string formatting.Nesting of WITH and other directives is possible.
Example:
// %WITH square, cube = int((x+1)**2), int((x+1)**3)
i += %{cube} + %{square} + %{x};
// %%END WITH
Assuming
xhas value9, this evaluates to:i += 1000 + 100 + 9;
String formatting
A line l in the source file may contain a string s with
balanced curly braces and preceded by a ‘%’ character.
Then the standard .format() method is applied to the string
s[1:] obtained from s by dropping the initial ‘%’
character. The dictionary names is given to the formatting
method as given as the list of keyword arguments.
E.g. in case names['x'] = y, the expressions %{x.z} and
%{x[z]} refer to y.z and y[z]. Of course, the objects
y.z or y[z] must exist and evaluate to strings which are
meaningful in the generated C file.
For formatting, the dictionary names is an updated version of
the dictionary tables passed in the constructor, as described
in section Arguments of directives.
We consider this to be a reasonable compromise between the standard
C syntax and the very powerful pythonic .format method for
strings.
Using functions via string formatting
User-defined functions can be invoked inside C code via the the
string formatting operator %{function_name:arg1,arg2,...}.
Then the function with name function_name is called with the
given arguments, and the result of the function is substituted
in the C code.
Such a user-defined function may be created with class
UserFormat. The simplest way to create such a user-defined
function from a function f is to create an entry:
"function_name" : UserFormat(f)
in the dictionary tables passed to the constructor. Then
%{function_name:arg1,arg2,...} evaluates to
str(f(arg1,arg2,...)).
Here arguments arg1, arg2 must be given in python syntax and
they are processed in the same way as the arguments of a directive
described in section Arguments of directives. Then you may also
write function_name(arg1,..) inside an argument of a directive
or a user-defined function; this expression evaluates to
f(arg1,...).
Class UserFormat also contains options to control the
conversion of the result of function f to a string.
There are a few built-in string formatting functions, as given
by dictionary built_in_formats in module
generate_functions.
There are a few predefined functions for string formatting:
%{int:x}returnsxas a decimal integer
%{hex:x}returnsxas a hexadecimal integer
%{len:l}returns length of listlas a decimal int
%{str:x}returnsstr(x)
%{join:s,l}returnss.join(l)for stringsand listl
See dictionary built_in_formats in module
mmgroup.generate_c.generate_functions for details.
So, assuming that keys 'a' and 'b' have values 1 and 10
in the dictionary tables passed to the code generator, we may
write e.g.:
y%{a} += %{int:3*b+1};
in the source file. This evaluates to:
y1 += 31;
Quiet form of a directive
For directives such as IF, FOR, … there are also quiet
variants IF*, FOR*, …, which perform the same operations,
but without writing any any comments about the directive into the
output file. E.g. in:
// %%FOR i in range(50)
printf("%d\n", i);
// %%IF* i % 7 == 0 or i % 10 == 7
printf("seven\n");
// %%END IF
// %%END FOR
you probably do not want any messy comments about the IF directive in your generated code.
Historical remark
In versions up to 0.4 string formatting operator was {xxx}
instead of %{xxx}. This had the unpleasent effect that
valid C expressions have a different meaning in the input and
and the output of the code generation process. This situation
became unbearable after intoducing doxygen for documentation
of C code. Then expressions like \f$ x_{1,1} \f$ could not
be coded in a reasonable way the old version.
Classes and functions provided by the code generator
- class mmgroup.generate_c.TableGenerator(tables={}, directives={}, verbose=False)
Automatically generate a .c file and a .h file from a source
Basic idea: We copy a source file to the .c file. The source contains directives to enter precomputed tables, code snippets or constants into the .c file, and prototypes into the .h file.
We copy the content of the source file directly to the .c file. In the source file we also parse certain directives and we replace them by automatically generated code snippets in the .c file and in the .h file.
The arguments given to the constructor of this class specify the meaning of the directives.
For a more detailed description of these directives see module
make_c_tables_doc.py- Parameters:
tables –
Here
tablesis a dictionary of with entries of shape:``name`` : ``table`` .
nameis a string that is a valid python identifier.tableis the python object to be referred by that name whenever an argument is evaluated as a python expression.directives –
Here
directivesis a dictionary of shape:``function_name`` : ``function`` .
The function
functionis executed when a directive of shape:// %%function_name
occurs as a directive in the source file. The arguments following the directive are evaluated and passed to the function
function. That function should return a string. This string is merged into the output .c file.If
directivesismmgroups.generate_c.NoDirectivesthen also built-in directives are not executed.verbose – optional, may be set
Truefor verbose console output
External modules importing this class should use methods
set_tables,generate, andtable_sizeonly.- generate(source, c_stream, h_stream=None, gen='c')
Generate a .c and a .h file form a source.
Here
sourcemust be an iterator that yields the lines of the source file. This may be a readble object of class_io.TextIOWrapperas returned by the built-in functionopen().Parameters
c_streamandh_streammust be eitherNoneor an instance of a class with awritemethod, e.g. a writable object of class_io.TextIOWrapper. Then the output to the c file and to the h file is written toc_streamand toh_stream.
- class mmgroup.generate_c.UserDirective(f, eval_mode='', prefix=False)
Convert a function for use in a code generator directive
Each code generator directive corresponds to a function. Evaluating that function with the arguments given to the directive results in a string that makes up the code generated by the directive.
The list of arguments of a code generator directive is necessarily a string. Usually, this string is converted to a python expression which is evaluated using the dictionary ‘tables’ given to the code generator. Here dictionary
tablescontains the local variables used by the evaluation process.The constructor of this class returns an object which is a callable function. Calling that function has the same effect as calling the function
f, which is the first argument passed to the constructor.Additional information for dealing with the arguments of the function may be given the constructor. This information is used by the code generator if an instance of this class is registered at the code generator as a directive. For registering a directive in that way you may simply enter an instance of this class as a value in the dictionary directives passed to the constructor of class
TableGenerator.Using this feature you may automatically convert arguments of the function e.g. to strings, integers or python objects. You may also prepend a local variable from dictionary
tablesto the list of user-specified arguments of the directive. The latter feature gives a directive the flavour of a member function of a class, similar to prependingselfto the list of user-specified arguments.- Parameters:
f – A callable function which is executed when the code generator parses a user-defined directive. The arguments of such a directive are passed to function
fas arguments.eval_mode –
This is a string specifying the syntax of the arguments. The i-th character of the string
eval_modecontrols the evaluation of the i-th argument of functionfas follows:'p'Evaluate the argument to a python object (default).'i'Evaluate the argument to an integer.'s'Evaluate the argument to a string, ignoring dictionary
It
eval_modeis'.'then a single parameter containing just the given string is passed to functionfas a single argument without any parsing with python.prefix –
Describes to an optional local variable of the code generator prepended to the list of arguments of the directive. It may be one of the following:
False: Nothing is prependedTrue: The dictionary of all local variables is prependedany string: The local variable with that name is prepended
- class mmgroup.generate_c.UserFormat(f, eval_mode='', prefix=False, fmt=None, arg_fmt=None)
Convert a function for string formatting in the code generator
The code generator evaluates expressions in curly braces
%{...}in the source code with the python.format()function for stings.It is desirable that
%{int:2*3}evaluates to a string representing the integer constantint(2*3)for some built-in and user-defined functions such as functionint.Therefore we need a python object with name
intthat behaves like the functionint()when being called. That object should also have a__format__method that returnsstr(int(<expression>))if a string representing a valid python expression is passed to the__format__method.UserFormat(int)creates such an object. Thus:tables = {"int": UserFormat(int)} "{int:2*3}".format(**tables))
evaluates to
str(int(2*3)). Of course, functionintmay be replaced by any user-defined function.Things get more interesting if we prepare a dictionary for the code generator:
from mmgroup.generate_c import TableGenerator, UserFormat
# Prepare tables for a code generator
tables = {"int": UserFormat(int),  "a": 3, "b":5}
# Create a code generator 'codegen'
codegen = TableGenerator(tables)
# Make a sample source line of C code
sample_source = "  x = %{int: a * b + int('1')};\n"
# generate file "test.c" containing the evaluated sample line
codegen.generate(sample_source, "test.c")
Here the string
{int: a * b + int('1')}in the sample source line is formatted with the standard python.formatmethod. The.formatmethod obtains the entries of the dictionarytablesas keyword arguments.So
%{int: a * b + int('1')}evaluates tostr(3*5+1), and the C file"test.c"will contain the line:x = 16;
So
UserFormat(f)creates an object the behaves likefwhen it is called; and it returnsstr(f(arg1,arg2,...))when it is invoked in"{f:arg1,arg2,...}".format(f = f).Here the argument list
arg1, arg2,...is processed in according to the same rules as the argument list of a user-defined directive in classUserDirective.- Parameters:
f – A callable function which is executed when the code generator parses a user-defined formatting string in curly braces preceded by a ‘%’ character, such as
%{...}. The arguments given in the formatting string are passed to functionfas arguments.eval_mode – This is a string specifying the syntax of the arguments in the same way as in class
UserFunction.prefix – Describes to an optional local variable of the code generator prepended to the list of arguments of the function in the same way as in class
UserFunction.fmt –
By default, function str() is applied to the result of function
fin order to convert that result to a string. This behaviour can be modified by setting parameterfmt.if
fmtis a callable function thenstr(f(*args))is replaced byfmt(f(*args)).arg_fmt – If this parameter is set then the corresponding
.formatmethod returnsarg_fmt(*args)instead ofstr(f(*args)). This overwrites the parameterfmt.
- mmgroup.generate_c.c_snippet(source, *args, **kwds)
Return a C code snippet as a string from a source string
Here
sourceis a string that is interpreted in the same way as the text in a source file in methodgenerate()of classTableGenerator. The function applies the code generator to the stringsourceand returns the generated C code as a string.All subsequent keyword arguments are treated as a dictionary and they are passed to the code generator in class
TableGeneratorin the same way as parametertablesin the constructor of that class.One can also pass positional arguments to this function. In the
sourcestring they an be accessed as%{0},%{1}, etc.A line starting with
// %%is interpreted as a directive as in classTableGenerator.The keyword
directivesis reserved for passing a dictionary of directives as in classTableGenerator.In order to achieve a similar effect as generating C code with:
tg = TableGenerator(tables, directives)
tg.generate(source_file, c_file)
you may code e.g.:
c_string = c_snippet(source, directives=directives, **tables)
If this function cannot evaluate an expression of shape
%{xxx}then the expression it is not changed; so a subsequent code generation step may evaluate that expression. An unevaluated argument in a directive leads to an error.
- mmgroup.generate_c.format_item(n, format=None)
Format a python object
nto a C string for use in a C tableThe default format is to apply function str() to the object.
The current version supports integer formats only. Parameter
formatmust be one of the following strings:'int8', 'int16', 'int32', 'int64', 'uint8', 'uint16', 'uint32', 'uint64'
- mmgroup.generate_c.make_doc()
- mmgroup.generate_c.make_table(table, format=None)
Convert a python table to a C sequence separated by commas
Parameter
tablemay be anything iterable. Functionformat_item(x, format)is applied to each item
xin the table.The output may contain several lines.
- mmgroup.generate_c.prepend_blanks(string, length)
Prepend
lengthblank characters to each line of astringHere parameter
stringis a string that may consist of several lines.
- mmgroup.generate_c.pxd_to_pxi(pxd_file, module=None, translate=None, nogil=False)
Extract Cython wrappers from prototypes in a .pxd file
A .pxd file contains prototypes of external C functions and it may be included into a .pyx file in order to create a Cython module that uses these C functions.
This function returns a string containing python wrappers of the C functions in the pxd file. This string may be used as a part of an automatically generated .pxi file that can be included directly into a .pyx file. Here the C functions in the .pxd file to be included must be sufficiently simple as indicated below.
The returned string starts with two lines:
cimport cython
cimport <module>
Here <module> is given by the parameter
module, By default,moduleis constructed from the namepxd_fileof the . pxd file.The .pxd file is parsed for lines of shape:
<return_type> <function>(<type1> <arg1>, <type2> <arg2> , ...)
Every such line is converted to a string that codes function, which is a Cython wrapper of that function of shape:
@cython.boundscheck(False)  # Deactivate bounds checking
@cython.wraparound(False)   # Deactivate negative indexing.
def <translated_function>(<arg1>, <arg2> , ...):
    cdef <type1> <arg1> = <arg1>_v_
    cdef <type2> <arg2> = <arg2>_v
    cdef <return_type>  _ret
    ret_ = <module>.<function>(<arg1>_v_,  <arg2>_v_ , ...)
    return ret_
<translated_function>is the string computed astranslate(<function>), if the argumenttranslateis given. Otherwise is<translated_function>is equal to<function>.<return_type>and<type1>, <type2>, ...must be valid types known to Cython and C. The types<type1>, <type2>used for arguments may also be pointers. Then pointers are converted to memory views e.g:uint32_t <function>(uint8_t *a)
is converted to:
@cython.boundscheck(False)  # Deactivate bounds checking
@cython.wraparound(False)   # Deactivate negative indexing.
def <translated_function1>(a):
    cdef uint8_t[::1] a_v_ = a
    cdef uint32_t ret_
    ret_ = <function>(&a_v_[0])
    return ret_
The
<return_type>may be void, but not be a pointer. Other types are not allowed.We convert a function only if a line containing the string “
# PYX” (possibly with leading blanks) precedes the declaration of a function. In the code generator you may use theEXPORTdirective with optionspxto enter such a line into the source file.If
nogilis True, a C function is called with as follows:with nogil: ret_ = <function>(&a_v_[0])
Then the C function
<function>must be e.g. declared as follows:cdef extern from "<file>.h" nogil: int <function> (int a, int *b)
This feature releases the GIL (Global Interpreter Lock) when calling the function.
- mmgroup.generate_c.generate_pxd(pxd_out, h_in, pxd_in=None, h_name=None, nogil=False)
Create a
.pxdfile from a C header file.Here parameter
h_inis the name of a C header file that has usually been generated with methodgenerateof classTableGenerator. In such a header file, some exported function are preceded by a comment of shape// %%EXPORT <parameter>There
<parameter>is a string of letters describing the way how a function is exported. The function is entered into the output.pxdfile if<parameter>contains the letter'p'.Method
generate_pxdcreates a .pxd file with namepxd_filethat contains information about these exported function.A .pxd file is used in Cython. Its content is:
cdef extern from <h_file_name>:
    <exported function 1>
    <exported function 2>
    ...
Here
<h_file_name>is given by parameterh_name.- Parameters:
pxd_out – Name of the output .pxd file.
h_in – Name of the header file from which external functions are copied into the .pxd file as a
cdef extern fromstatement.pxd_in – An optional name of a input .pxd file to be copied in the output .pxd file in front of the
cdefstatement. If that parmeter is a string containing a newline character\nthen that string is copied directly into the output .pxd file.h_name – Name of .h file to to be placed into the statement
cdef extern from <h_file_name>.nogil – Optional, exported functions are declared as
nogilwhen set.
Support for Sphinx mockup feature when generating documentation
We use the Sphinx package on the Read the Docs server for generating documentation. On that server we do not want to compile .c files. However, we want the .c files to be present for extracting documentation from them, using the Doxygen tool. Here it suffices if the prototypes and comments relevant for documentation are present in the .c files.
This means that we have to perform the code generation process also
on the documentation server. Note that some code generation procedures
in the Tables classes in the python modules used for code generation
rely on compiled Cython extensions. But Cython extensions will not
be compiled on the documentation server. To avoid using compiled code,
in each python module to
be used for code generation we may add a MockupTables class to
the Tables class already present. Such a MockupTables class
may generate the parts of a .c file relevant for documentation only,
without using any compiled Cython extensions.
We may set the --mockup option in the code generation tool
generate_code.py. Then any Tables class in a python module to
be used for code generation is replaced by the MockupTables
class in that module, if present.
How the code generator is used
Warning!
At present the process of generating C code is under construction.
We plan to switch to the meson build system. Therefore a much more
declarative style is required for describing an buld operations.
Thus the description here is pertty much outdated!
For generating C code, an instance of class TableGenerator in module
mmgroup.generate_c must be generated. That instance takes two
arguments tables and directives as described in section
Code generation.
There are many tables and directives needed for different purposes. By
convention we provide a variety of classes, where each class provides
two attributes tables and directives providing dictionaries of
tables and directives, respectively. These dictionaries are suitable
for creating instances of classes TableGenerator. Such classes
are called table-providing classes. Attributes tables and
directives may also be implemented as properties.
Python scripts with names codegen_xxx.py in the root directory of
the source distribution create instances of class TableGenerator
that will generate C programs and also the corresponding header files.
These python scripts are run as subprocesses of the build_ext
command in the setup.py script.
Each instance of class TableGenerator may take the union of the
directories obtained from methods tables() and directives()
of several table-providing classes. A simple example for a
table-providing class is the class Lsbit24Function
in module mmgroup.dev.mat24.mat24_aux.
Description of some typical bugs
In this section we decribe some typical bugs that may occur during the develpment process and that may be extremely hard to find.
1. Cleaning up a corrupted local git repository
After a long development session the local git repository might be corrupted for what reason ever. Here the best cure is to delete everything in the repository (exept for subdirectory .git) and to checkout everythinh with git. If you do not want to do so, you may cleanaup intermediate files as follows.
First open a command shell, switch to the root directory of your local repository, and make sure that your C compiler works in that shell. Then enter the following statements:
python cleanup.py -a
git checkout .
python setup.py  build_ext --inplace
python -m pytest ./src/mmgroup/ -v -s -m "not slow"
Then for creating the documentation you should enter something like the following (details depending on the operating system):
cd docs
sphinx-build -M html source build  -E -a
sphinx-build -M latexpdf source build  -E -a
cd ..
2. Documentation is created correctly on the local host but not on readthedocs
Whenever we update the master branch in git on the gitbub server, this automatically starts a process on the readthedocs server that updates the documentation. In that case the developer should check the documentation on the readthedocs server at
https://mmgroup.readthedocs.io/en/latest/index.html
If this documentation is incorrect then the developer should check the logfiles of the last generation of the documentation on readthedocs. For generating documentation, the readthedocs server starts a sequence of processes, and for each process the output is logged.
There is one type of bug that is difficult to find. If this bug occurs,
then in the output of one of the processes that invokes
python -m sphinx ... there may be an error message similar to the
following message:
WARNING: autodoc: failed to import module ‘mm_group’ from module ‘mmgroup’; the following exception was raised:
No module named ‘mmgroup.mat24’
This message has to do with the mockup of python extensions when running the Sphinx documentation tool on the readthedocs server.
We do not use any C compiler on the readthedocs server, so that python extensions written in Cython are not available. When running Sphinx then all python objects to be documented are imported, so that their docstrings can be processed. Therefore all Cython extensions must be mocked up in Sphinx. This means that we tell Sphinx that these extensions are not available. For details see
https://www.sphinx-doc.org/en/master/usage/extensions/autodoc.html#confval-autodoc_mock_imports
The Cython extension mat24 is not mocked up in Sphinx, but it
is replaced by class mmgroup.dev.mat24.mat24_ref.Mat24 instead.
So instad of simply importing the extension mat24 we have to do
the following:
>>> try:
>>>    from mmgroup import mat24
>>> except (ImportError, ModuleNotFoundError):
>>>    from mmgroup.dev.mat24.mat24_ref import Mat24
>>>    mat24 = Mat24
More sophisticated examples of importing objects from module mat24
are given e.g. in modules mmgroup.mm_group and
mmgroup.structures.autpl.
One way to debug such a problem on the local host (and not on the
readthedocs server) is as follows. Use pip uninstall mmgroup
(or similar) to uninstall the mmgroup package Then execute the
following commands in your shell:
python cleanup.py -a
git checkout .
set readthedocs=True
python setup.py  build_ext --inplace
cd docs
sphinx-build -M html source build  -E -a
sphinx-build -M latexpdf source build  -E -a
cd ..
# Here you should inspect the output of the sphinx-build
# commands for debugging
unset readthedocs  # in Windows use 'set readthedocs=' instead
# Reverse the effect of  'set readthedocs=True'
If you are lucky then the errors occuring on the readthedocs server will now also occur on your local host.
Warning
After typing that sequence into your shell, your environment is probably corrupted; and you should proceed as in subsection Cleaning up a corrupted local git repository.